I love this project because it was such a challenge on many levels, but the end result (tap here to go right to the post) was a huge success! I will attempt to briefly chronicle how the process worked out, giving insight to what I did along the way.
I shot footage of the parts being printed in timelapse.
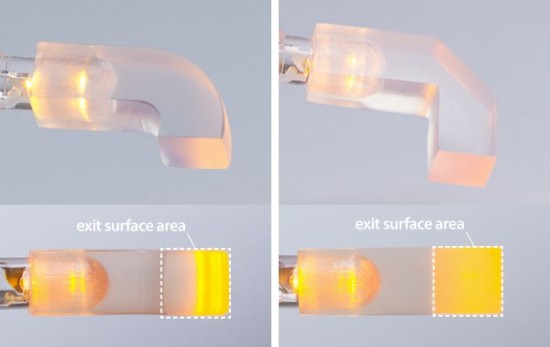
This whole piece was really from a simple Q&A session on a webinar I was hosting. The question was if a “light pipe” (clear plastic that bounces an LED indicator to appear somewhere more visible to the user) could be 3D printed as a working prototype? We knew the answer was probably yes, but I saw the opportunity to do a mini-project where we reverse-engineer a working light pipe, try it in a 3D printed version, and blog about the results.
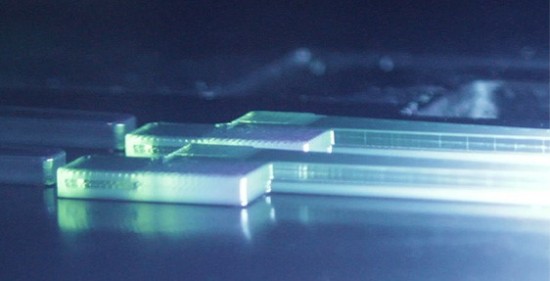
My first task was to find a suitable light pipe to test, and have one of our engineers build it in CAD. Our 3D printing center is in Connecticut, and so I created a 2D drawing of the part and sent it over. About 20 minutes later they sent a 3D Solidworks rendering and it looked great! Within an afternoon they had printed the light pipe and suddenly I realized we really were doing exactly what was never possible before 3D printing: creating a functional prototype in a few hours and a few dollars. This fact would become the heart of the story, not the technology!
Here’s a snippet from the blog post (read the full post here):
Design engineers take note: the part you see went from CAD to functional testing in about two hours,including printing and post-processing. Part cost was under $5.
With such a fast turnaround, the designer could test and choose the best of multiple designs (we printed four iterations at once), then even revise and print the same day. This rapid iteration cycle allows for more design ideas, and a much higher confidence in the design going forward to the next prototyping stage. As a bonus, the time for these additional iterations is still far shorter than the traditional method.
So I basically had the story as a blog, but decided it was worthy of a video too. By the time the project was done, we had four people involved. I was directing the project, writing the content and video, and interfacing with the vendor on the progress of it all. Two from our Connecticut office did the CAD design, 3D printing, and post-processing. I also worked with a fellow marketing team member who did the video camera work.
A little bit of graphics helped the video and gave an illustration for the blog post.
The results were better than I had expected. The video was posted to the vendor’s site as a trackable element, so I could see the watches and was delighted to find a wide audience of viewers and the numbers eventually surpassed all of our other 3D printing videos! I also pitched a national blog covering 3D printing who picked up the story.
Ready to see it all together? Tap here to take a look at the final piece over at the Stratasys blog. Note that unfortunately the video is no longer available after the acquisition of CADD Edge.